Debug Your Plugin
During the plugin development process, you will often encounter challenges such as logic errors in the code, compatibility issues with other components, performance bottlenecks, and so on.
Using breakpoints effectively can help us quickly analyze and locate issues.
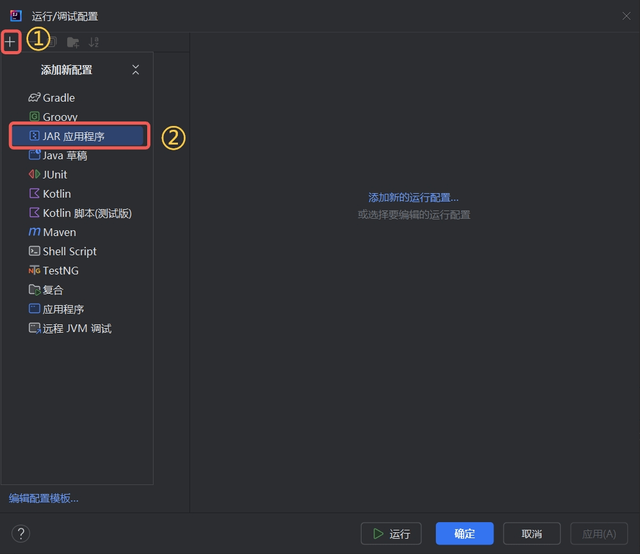
Plugin debugging requires editing the Run/Debug Configurations in IntelliJ IDEA beforehand.
Editing Debug Configurations
- Open your project in IntelliJ IDEA.
- In the top bar, open the
Run/Debug Configurationswindow. - Choose the
JAR Applicationtemplate.
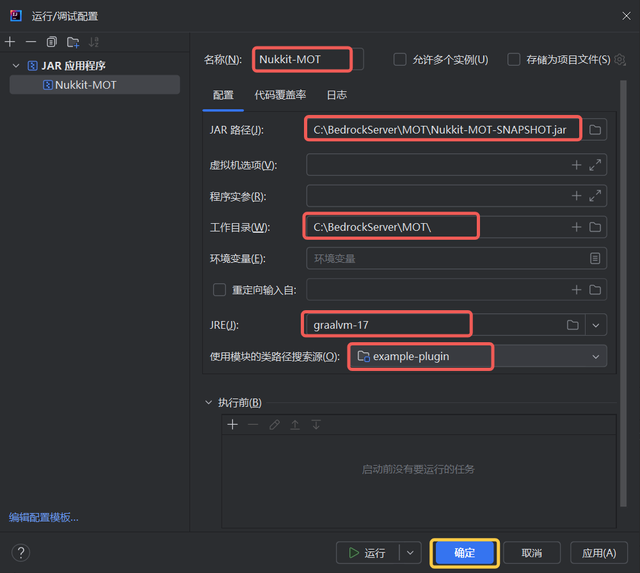
- Edit the configuration settings as follows:
| Field | Description |
|---|---|
| Name | Nukkit-MOT |
| JAR Path | Specify the full path to Nukkit-MOT-SNAPSHOT.jar |
| Working Directory | Specify the folder path where Nukkit-MOT server is located |
| JRE | Choose Java 17 Runtime |
Finally, click OK.
Auto-Update Plugin to Plugins Dir After Build
With the above steps, we can now use the Shift + F9 shortcut to debug code.
It's important to note that debugging with breakpoints is only possible if the JAR plugin matches the current project's build artifacts.
For convenience, we aim to automatically update the plugin to the plugins directory each time a build is successful.
Here’s how to configure the pom.xml file in a Maven project to meet our needs.
Adding Relevant Properties
included within <project>.
    <groupId>cn.nukkitmot</groupId>
    <artifactId>example-plugin</artifactId>
    <version>1.0.0</version>
    <name>ExamplePlugin</name>
    <description>An Example Nukkit-MOT Plugin</description>
    <url>https://github.com/MemoriesOfTime/ExamplePlugin-Maven/</url>

    <properties>
        <project.build.sourceEncoding>UTF-8</project.build.sourceEncoding>
        <maven.compiler.source>17</maven.compiler.source>
        <maven.compiler.target>17</maven.compiler.target>

        <nukkitPluginsPath>C:\BedrockServer\MOT\plugins</nukkitPluginsPath>
    </properties>
artifactId is the name of the plugin, which by default is used as the name for the build artifact.
nukkitPluginsPath is the path to the plugins directory, which you need to manually add in your debugging environment.
Adding Maven plugins Tag
The <build> tag is included within <project>.
    <build>
        <defaultGoal>clean package</defaultGoal>

        <plugins>
            <plugin>
                <groupId>org.apache.maven.plugins</groupId>
                <artifactId>maven-jar-plugin</artifactId>
                <version>3.2.0</version>
                <configuration>
                    <outputDirectory>${nukkitPluginsPath}</outputDirectory>
                </configuration>
            </plugin>
            <plugin>
                <groupId>org.apache.maven.plugins</groupId>
                <artifactId>maven-clean-plugin</artifactId>
                <version>3.2.0</version>
                <configuration>
                    <filesets>
                        <fileset>
                            <directory>${nukkitPluginsPath}</directory>
                            <includes>
                                <include>${artifactId}*.jar</include>
                            </includes>
                        </fileset>
                    </filesets>
                </configuration>
                <executions>
                    <execution>
                        <phase>pre-clean</phase>
                        <goals>
                            <goal>clean</goal>
                        </goals>
                    </execution>
                </executions>
            </plugin>
        </plugins>
    </build>
Usage
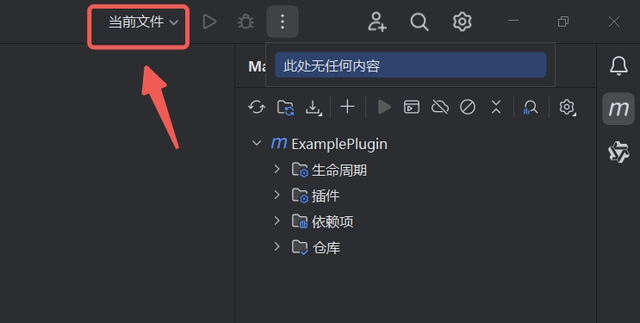
- Click the letter M icon on the right side of IDEA to open the Maven panel.
- Click
cleanto clean, thenpackageto build and package.
Note that you need to clean before building and packaging, or the previous JAR artifacts won't be updated.
ExamplePlugin
    Lifecycle
        clean
        validate
        compile
        test
        package
        verify
        install
        site
        deploy
    Plugins
    Dependencies
    Repositories
Congratulations, you have now completed all the configurations.