Run and Debug Your Plugin
Before setting breakpoints, make sure the plugin can actually load on a local server.
Step 3 of 4: put the jar into a server, verify that it loads, and then attach the debugger.
Previous: Plugin Basics
1. Prepare a Local Server Folder
Create a clean folder for your test server and place the Nukkit-MOT server jar in it.
Start the server once:
java -jar Nukkit-MOT-SNAPSHOT.jar
After the first start, the server will usually generate folders such as plugins/, worlds/, and configuration files. Stop the server after that.
2. Put Your Plugin into plugins/
Copy the jar built on the previous page into the server's plugins/ folder:
target/hello-world-plugin-1.0.0.jar -> <your-server>/plugins/
If you renamed the build artifact, copy that file instead.
3. Start the Server and Verify the Plugin Loads
Start the server again:
java -jar Nukkit-MOT-SNAPSHOT.jar
You should look for two kinds of confirmation:
- A server log line that mentions
HelloWorldPlugin v1.0.0 - The log line from your
onEnable()method, such asHello from my first Nukkit-MOT plugin!
After the server is running, use one of these commands:
plugins
or:
pl
If the plugin loads correctly, it should appear in the plugin list. In many consoles, a successful plugin name is shown in green.
4. Check These First If Loading Fails
Most first-plugin failures come from one of these problems:
plugin.ymlis missing from the jar root- The
mainfield does not match the real package name and class name - The jar was copied to the server root instead of
plugins/ - A required dependency from
dependis missing - You changed the code but forgot to rebuild the jar
If the plugin name appears in red or the server prints a stack trace, start by checking these items before you debug Java code.
5. Optional: Copy the Jar into plugins/ After Every Build
Once the plugin can load manually, you can speed up your workflow by writing the built jar directly into the server's plugins/ folder.
Add a property to pom.xml:
<properties>
  <maven.compiler.release>17</maven.compiler.release>
  <project.build.sourceEncoding>UTF-8</project.build.sourceEncoding>
  <nukkitPluginsPath>D:\BedrockServer\MOT\plugins</nukkitPluginsPath>
</properties>
Then add a build section:
<build>
  <defaultGoal>clean package</defaultGoal>

  <plugins>
    <plugin>
      <groupId>org.apache.maven.plugins</groupId>
      <artifactId>maven-jar-plugin</artifactId>
      <version>3.4.2</version>
      <configuration>
        <outputDirectory>${nukkitPluginsPath}</outputDirectory>
      </configuration>
    </plugin>
    <plugin>
      <groupId>org.apache.maven.plugins</groupId>
      <artifactId>maven-clean-plugin</artifactId>
      <version>3.5.0</version>
      <configuration>
        <filesets>
          <fileset>
            <directory>${nukkitPluginsPath}</directory>
            <includes>
              <include>${artifactId}*.jar</include>
            </includes>
          </fileset>
        </filesets>
      </configuration>
      <executions>
        <execution>
          <phase>pre-clean</phase>
          <goals>
            <goal>clean</goal>
          </goals>
        </execution>
      </executions>
    </plugin>
  </plugins>
</build>
Now mvn clean package writes the newest jar directly into your server plugin folder.
6. Attach the IntelliJ IDEA Debugger
After the plugin loads normally, configure IntelliJ IDEA to debug the server process.
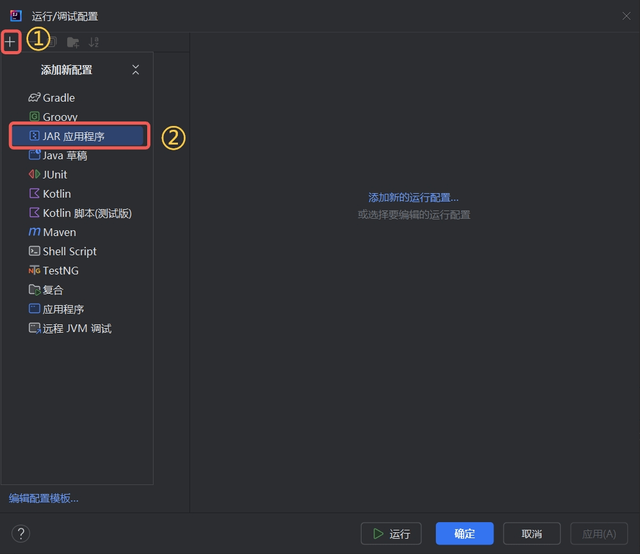
- Open your project in IntelliJ IDEA.
- Open the
Run/Debug Configurationswindow from the top bar. - Choose the
JAR Applicationtemplate.
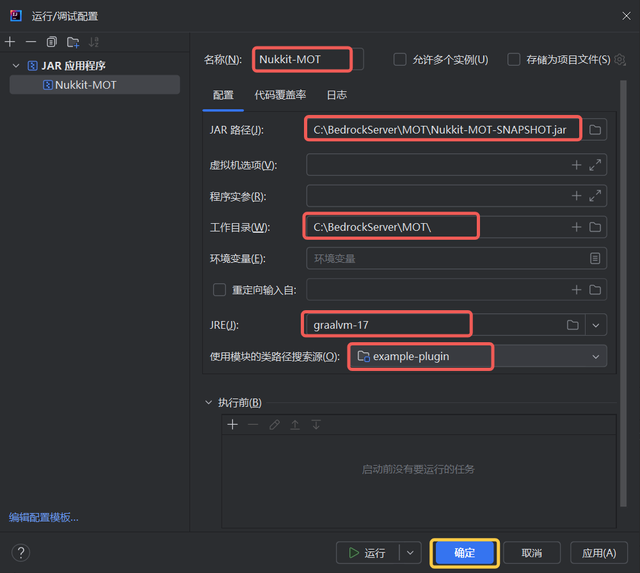
- Use settings like these:
| Field | Description |
|---|---|
| Name | Nukkit-MOT |
| JAR Path | Full path to Nukkit-MOT-SNAPSHOT.jar |
| Working Directory | Your local Nukkit-MOT server folder |
| JRE | Java 17 runtime |
Finally, click OK.
Set a breakpoint in onEnable() and start debugging with Shift + F9.
Breakpoints only match the code you built. If the server is still running an old jar, your breakpoint results will be confusing.
Before You Continue
- Manual loading is your first validation step
- Breakpoint debugging is the second step, not the first
- When the plugin loads and you can reproduce changes locally, continue to Publish Your First Plugin